PD-Belt™ For an Active Lifestyle
PD-Belt™ Application and Cleaning Instructions
Applications
The elastic PD-Belt™ stretches and is adjustable at the Velcro closure which, depending upon your catheter exit site position should be placed on your left or right side. The PD-Belt™ has been designed to be worn at all times and for all activities; day and night, while exercising, working, resting, sleeping, eating, showering and especially when you are doing your Peritoneal Dialysis (PD) exchanges. For maximum cleanliness and comfort, it is recommended that a belt be replaced every 40 days.
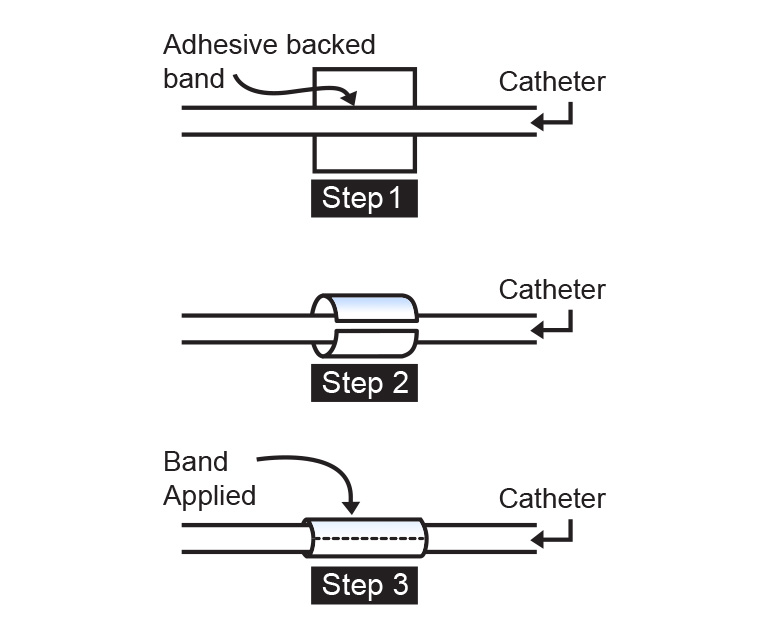
How to Apply the Adhesive Band
The proper location is found by creating a soft loop with the catheter as it exits the abdomen. Attach to belt with the Velcro tabs.
Place the connector securely into the pocket. Re-adjust for maximum comfort and when you are satisfied, release the outer Velcro flap Tap “A” (the one farthest from the pocket), and glue the tacky back surface of the small piece of Velcro, included with these instructions, exactly where the tube intersects Tab “A.”
Make sure the tube is clean and dry for better adhesion. Each Velcro band should last more than a month even with showering daily, provided it has a chance to “cure” for several hours before getting wet again.
Application: To Secure the Catheter
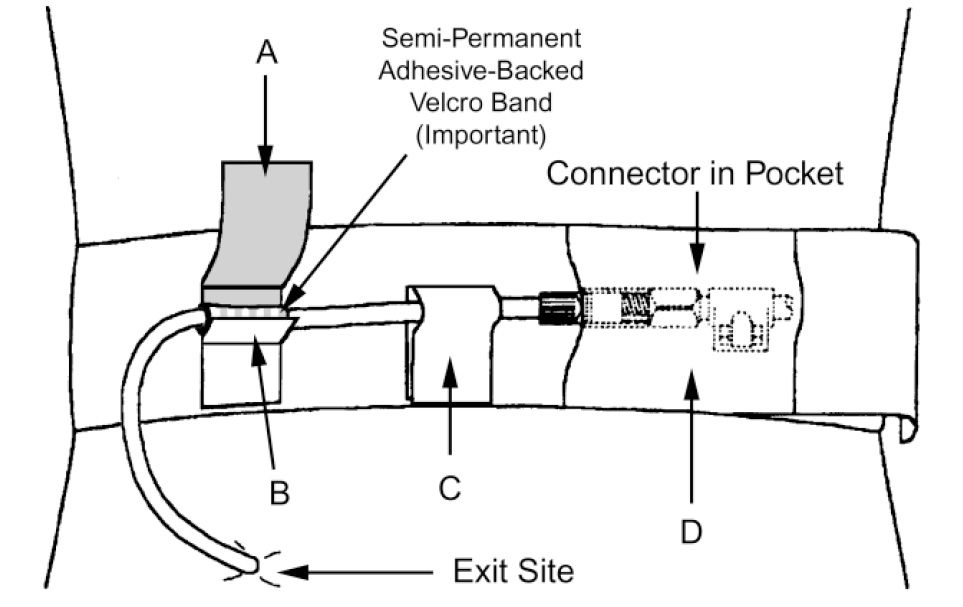
Place the belt around your waist and position it so that the outer Velcro Tab “A” is positioned above your exit site. For a left exit site, tab will open downward; a right exit site will open upward.
Make a short soft loop of the catheter tube upward toward the belt and place it parallel with the belt across the Velcro fastener “A” and under tab “B”. Fold tab “B” up over tube while folding tab “A” on top of tab “B” and catheter with your thumb and index fingers. This will hold the tube firmly to the belt at that point. Make sure the Velcro fits snugly around the tube.
Continue to run the tube across Velcro fastener “C,” but don’t secure it yet. With tab “C” in the open position, place the connector end of your catheter inside the elastic pocket “D.” Finish fastening your tube to the belt by closing Velcro tab “C” over the tube as you did with tabs “A” and “B.” The catheter is now secured with the connector in the pocket and the two tabs are closed.
To increase stabilization of the catheter at the exit site, you should apply the self-adhesive band which came with the product. After you have placed the connector in pocket “C,” apply the semi-permanent, self-adhesive band around the catheter where it intercepts tab “A.”
Do the Exchange
To perform your exchange, loosen your clothing, double check that your tube is secure at tab “A” by solidly pinching it (if you use the Velcro band around the catheter this is unnecessary), unfasten tab “C,” then slide the connector out of pocket “D.”
You can now do the exchange as instructed. You will, of course, want to protect yourself by being very careful while you handle your bags on your I/V pole. Even the PD-BELT™ won’t totally protect your exit site if you drop the full bag of fluid suddenly. Use both hands to hang your bags and let your PD-BELT™ hold your tube in position.
When the exchange is done simply replace the connector in the belt pocket “D,” re-secure the middle tab “C” over the tube, adjust the belt size if necessary, then refasten your clothing and resume your normal activities.
Changing To A Dry Belt
After you have showered with your wet belt on, dry off and fasten a fresh, dry belt approximately 1” above the one you are wearing. On the wet belt, unfasten tab “C,” remove the connector from the pocket “D” and place it into the pocket “D” of the dry belt. Fasten tab “C.”
Now unfasten tab “A” on the wet belt and remove the catheter (with the self-adhesive Velcro band attached). Pinch the Velcro band around the catheter to confirm that the adhesive is holding. The catheter will now swing away from the wet belt. Unfasten the wet belt and carefully remove it by sliding it away from under the catheter loop.
Fasten the catheter to the dry belt at tab “A”, close tab “A” and adjust the belt to the proper height.
Suggested Adjustments And Medication
As you bloat or shrink during the day or night either from the dialysis process or from meals, just tighten or loosen your belt for maximum comfort. Small changes in girth will be accommodated by the give of the elastic. More expansive adjustments will require releasing the Velcro closure and repositioning to the proper size.
You can medicate your exit site while wearing your PD-Belt™. Simply secure your tube to the belt as you normally would. Apply whichever ointment, cream or liquid your doctor have prescribed and place a folded 2” by 2” strip of gauze under the tube at the exit site for cushioning and another strip of gauze, the same size, over the top and securing it with paper tape. The paper tape will hold without curling if it is positioned vertically (up and down) and place under the PD-Belt™.
Cleaning Instructions
To clean the belt, we recommend hand washing the belts with a mild liquid detergent and cold water. Rinse and air dry only. For extremely soiled belts, one can put a little hydrogen peroxide into the wash water, the peroxide will act as a natural bleaching agent. DO NOT put in a washing machine or dryer.
Left Exit Site
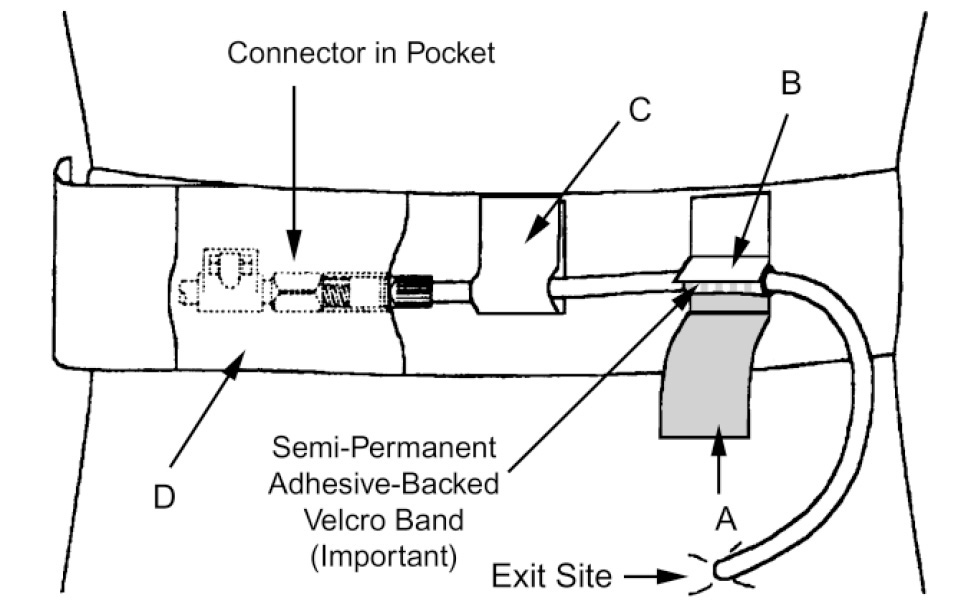
Right Exit Site